Creating Website from Scratch

During the group project of the module, I was assigned to the marketing team to present our final product to the audience in an interesting way. While brainstorming we thought it would be a great idea to have a website that people could visit and view or progress on. I wanted to take on this task because in year one for our portfolio site we had the option to create a site from scratch yourself or use a template with WordPress. At the time I chose the latter because creating a website from scratch got me intimidated. Now I have developed a different thought process where I take on a challenge instead of backing down and sticking to the comfort zone. This creation process has made me aware of my technical capabilities and definitely boosted my confidence when entering unknown territory.

I had to do some research on how to make a website from scratch, and asked my fellow peers for help. They recommended me to work in Jetbrains Webstorm IDE, which is a development environment that will allow me to work in HTML and CSS with ease thanks to intelligent code completion and the IDE running dozens of inspections as you type detecting potential errors pretty much instantly. I think that a lot of time has been saved thanks to its advanced features.

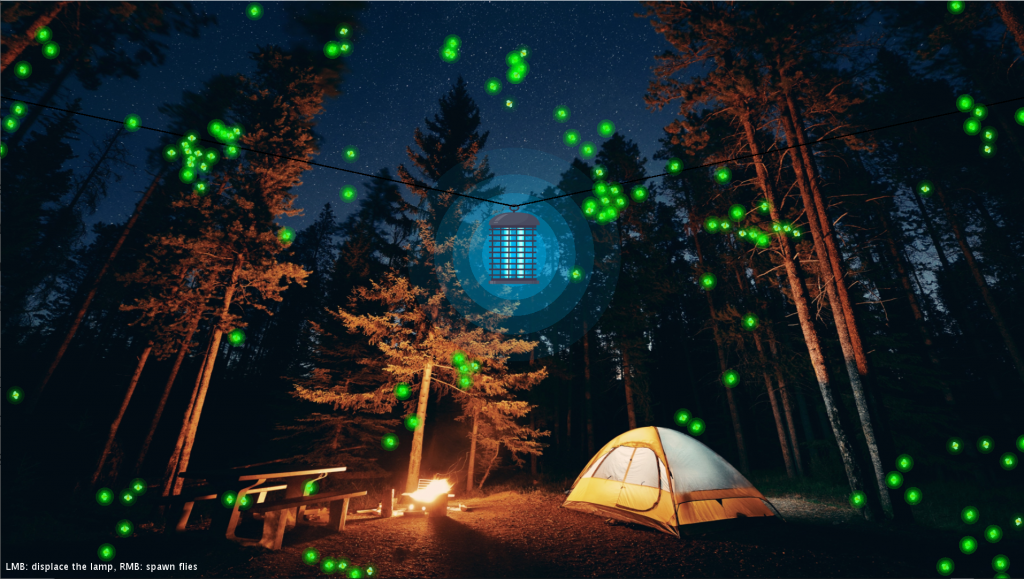
Together with the marketing team we already defined a color palette that would be used for the project. In addition I designed the logos and wave pattern that can be seen on the web page

In order to have the website work on all kinds of devices it had to be responsive. Bootstrap is a popular HTML, CSS and JS library that allows you to divide your site up into sections with rows and columns. When the window size is adjusted, bootstrap will adjust the contents respectively keeping everything inside its boxes nicely ordered(and scaled if you added the correct class and CSS to it).

During the creation process I noticed that if you would look for creating a website, a vast amount of the search results will be paid services that offer templates and hosting plans. There is quite a lack of video tutorials out there but luckily there were alternatives to obtaining knowledge. There are a lot of questions of those who came before about HTML and CSS using Bootstrap with various possible solutions given on websites like Stack Overflow. Also w3schools.com and the official bootstrap site itself offered very detailed information regarding the coding of the web page. Something that was challenging at times was formulating my search query correctly. I was not familiar with the terminology in the beginning but as time went by I quickly adapted to the jargon and managed to search for answers more effectively.

The total creation process took 3-4 days, working from early morning till afternoon. Creating a website is a process of trial and error. You add a new piece of code, save the file and refresh the browser to see if the code gave the result you were hoping to achieve. One source that was the most helpful was a man going through the process of creating a simple web page with bootstrap 4. This gave me great insight in syntax, semantics, the various elements and the overall structure that the code should be in.

The only thing that I didn’t manage was getting the website online. I don’t have the hardware to run a server on and hosting plans were not something I wanted to purchase. Creating your own server for hosting does seem like a fun project to follow up on in the future. You are still able to view the website by downloading the .zip from the link and then opening the “index.html” file in google chrome.

***Note that the contact information on the website is fake and should not be used for contacting me.***

See me going through the website here:

Download the .zip here

Theory of Knowledge

This essay was a philosophical task in which students had to discuss a statement with reference to two areas of knowledge. I chose to include this in my portfolio because it made for an interesting discussion.

the statement was: “We know with confidence only when we know little; with knowledge doubt increases” – adapted from JW von Goethe

The essay can be viewed and downloaded from HERE

A Firefly’s worst enemy- interactive java script project

As final project for the Algorithms course, a colleague and I were tasked to create a program that featured (almost) all of the material that was taught during the module. In the end we came up with a game where the player is able to drag a lamp over the screen, which is attached to a rope. By letting go of the rope a mass-spring-damper system takes care of the transient bouncing animation. If any of the firefly’s are caught in its path, they will explode and make a satisfying electrical sound. The fireflies are programmed such that they will be attracted by the lamp, fly in flocks over an ever-changing vector path that provides them the direction they should be going in. the vector path is defined by Perlin Noise, which is a gradual randomization creating the flowing animation of the firefly flocks.

However, Processing (the program you need to run the interaction) can’t handle too many sounds at once so if the sound starts to act unexpected, simply close and reopen the program. Instructions for the program are: left mouse button to displace the lamp, and letting go of the left mouse button will make it oscillate to its equilibrium position. The right mouse button is to spawn fireflies but take it easy. The program can be downloaded from HERE, but below is a screenshot if you don’t want to.

image of interactive program

Fake Art Installation

We were tasked to create a vice-styled article about an art installation that didn’t exist, which we ourselves supposedly created. in addition the article had to be written from the perspective of an Art-installation maker. This was simply a fun creative writing task but i found it worth sharing.

Perlin noise vector flow field

For this module I decided to improve my coding skills by watching and reading countless tutorials and informational sites about JavaScript. JavaScript is used a lot in the Creative Technology course and when it was reintroduced in the start of module 4 I found myself lacking the essential basics to start writing programs for the class Algorithms for Create. I wanted to improve my overall understanding and skills of programming so that in the future I would never run into the issue again.

In the end i believe that a better understanding of JavaScript will help me understand other programming languages much quicker as well, as they all feature some similar structure.

The most fun part of this learning process is that you can practice and aren’t obligated to only studying other sources. By practicing coding myself and solving my own problems, my overall understanding has exceptionally expanded. It is satisfying to watch a program do what it is supposed to do and when i accomplished that, i want to add more functionality to that program. That loop keeps going on and on now and programming has become quite addicting.

Thus, for this module i decided to code my own art work with a sophisticated algorithm called Perlin noise. The method is used in procedural content generation but is different from a random number generator. random numbers can be 1 9 4 3 5 7 where as Perlin noise would me more procedural like 4 5 6 5 4 3 4 which is great for creating smooth random motion.

The code is animated but I will show screenshots of my work below.

Screenshot of code in action

The coloured particles move over the screen by following a vector field that passes the vector heading values into each particle. In combination with Perlin noise it creates the illusion as if the particles are flocking/staying together and move in a very flowing and natural way. It was great to be able to create this piece and it was surely worth the effort.

You can download the folder with the classes HERE. In addition you will also need Processing for your system. when you open any of the classes in the zip file, click on run in the top left corner and then press space bar to see the flow animation in action yourself.

3D Modeling – Maya

During the course of Module 3 we were tasked to create the scenes below using Autodesk Maya, a 3D modeling software. This was the first time i got to work with such software and it instantly got my attention. Being able to think of a creation in your head and then realizing it using 3D modeling software is extremely satisfying. I would love to create more for personal use in the future and perhaps create a little business out of it too.

Below is the gallery of creations up to now, of which the last 2 were performed with Python instead of modeling each cube by hand. For full-quality images click HERE

Data on transport during COVID-19

During the semi-lock down period in the Netherlands a series of datasets regarding the transportation sector were analyzed and converted to comprehensible graphics. The data includes that of the Public Transport (OV), Schiphol (airport), a road traffic related visualization and search term inquiries related to travel. The file should be downloadable from the icon above and it that’s not the case you could try the link to Drive below.

If the above link did not work, you can try to view the workbook on Drive by clicking HERE

Extra Lazy Susan

I like the word ‘indolence’. It makes my laziness seem classy.

Bernard Williams

First First off: This is an ongoing project, tools required for finishing the project are on university grounds which can’t be accessed due to COVID-19.

Second First off: A lazy susan is a turntable placed on a table to act as a food distributing aid. Food can be placed on top and be rotated around the table, so that you don’t need to lean over the entire table to grab something of a plate. The extra lazy susan is a personal project, that will allow you to turn the table without touching it, like magic.

It started off with research, finding the right components for the job that could be delivered in the desired time frame and would not cost a fortune to acquire. Light Dependent Resistors (LDR) are able to vary resistance based on light intensity. The resistance decreases when incident light intensity increases. So, the voltage over the LDR drops to a certain number (between 0 and 1023) depending on the amount of light that is blocked. Two LDR’s will be used to sense if the user wants to turn left or right. If both LDR’s are blocked at the same time, the system will stop and flash an LED, giving feedback to the user to only use one direction at the time.

To control the motor it is easiest to use either a stepper motor or DC motor in combination with an H-bridge, to easily switch polarities for going left or right. An H-bridge will supply the necessary power for the motor from an external power source relieving strain on the Arduino’s power supply, who’s current source probably wouldn’t be up for the task. The task requires high-torque, low to medium speed as the table can be quite heavy and it is not desired to spin all the food onto the surrounding users. The ideal H-Bridge to use is a DRV8871 dc motor driver but cost a fortune to ship(from adafruit), which resulted with having to use a (much cheaper) L298N. A less efficient Dual H-Bridge but it will suffice for the prototype. In the mean-time, a DRV8871 from Aliexpress has been ordered and will be used in the final build.

Stage 1: prototyping

Prototype ELS.

Unfortunately, it never got past this stage due to the university closing down resulting in the inability to access the materials and equipment needed. This involved 3D printing and laser cutting services, and PCB/wires/soldering stations. I wish i could show more, but this will have to do for now.

Measurements of motor for 3D designed parts.

Final Project Result Module 1

Interactive video project

For the final project of We Create Identity, we were tasked to make an interactive video. The group and I decided on making a video about a boy who walked past the wrong alley at the wrong time and witnesses a robbery. At this point the audience gets to make their very first choice, with many more to follow. if you would like to check out the video, download the map from here.

  • INSTRUCTIONS:

When the folder is downloaded, open the “index” file in Microsoft Edge. If all you see is a black screen, zoom out with “Ctrl – ” until you see the pause/play and stop button appear in the bottom left of the window.


Story about the We Create Identity End Exhibition (Final Module Expo)

At the expo the students were given the opportunity to present their videos to each other and also display their posters. The posters looked great and had a professional appeal, same with the videos. Unfortunately I didn’t get to see all the videos due to me supervising the visitors at our station. However, i’ve heard some great things from my fellow team members. From what i have seen in this first module’s final expo, i believe that there are many great things to follow. i can’t wait to see what our future projects behold.

Using light to find the average thickness of the human hair!

Ah, physics. Long time no see!

In this second post for my portfolio I present you an investigation I made on finding the width of a hair using single-slit diffraction in
accordance with Babinet’s principle.

By pointing a laser onto a hair, the light projected onto a flat surface behind it will show an interference pattern, created by the diffraction of light around the hair. The phenomena isn’t single slit diffraction, it is the inverse of single slit diffraction, in accordance with Babinet’s principle.

“The diffraction pattern from an opaque body is identical to that from a hole of the same size and shape except for the overall forward beam intensity” – Jacques Babinet

If you are interested in giving the experiment a read through, click here

Grade: 7/7, 12 pages incl. MLA citations and bibliography